March 2010
Showing posts with label crafts. Show all posts

Monday, August 10, 2009

Summer Crafts Contest

Show Martha Stewart your best summer crafts for a chance to win a Martha Stewart Crafts Butterfly Tissue Paper Pom-Pom Kit.

Visit MarthaStewart.com and upload a picture of your best summer craft!

Deadline: August 31st, 2009

Wednesday, August 5, 2009

Handmade Party Favors

I love this list of Handmade Party Favors put together by Martha Stewart Crafts. Just a few of my personal favorites are:

{town house gift boxes}

{paper candy cones}


{tea and cookies}


{striped favor boxes}

You can shop Martha Stewart Crafts and more at ScrappyTime.com!

Posted By: Nichole

Sunday, August 2, 2009

The Perfect Jar: The Mason Jar


Mason jars have been my new favorite thing. They remind me of baking soda because their uses are endless! Lately I have been using them to drink out of and I swear they even make my water look fancy. Mason jars add a nice touch to everything with little effort. I was thinking about how many things me and my family have done with mason jars and I had to put them all together into one post. Many of these ideas are referenced on my sister's blog, Melissa's Greetings. She is much better about documenting all of the fabulous crafts that we do in ourspare time.

{Our table at Christmas. The centerpieces are clear mason jars with paper snowflakes in them.}

{My sister made a small mason jar lamp.}

{Centerpieces at my sister's wedding.}

My brother in law even engineered his very own firefly lights and captured them in mason jars! Wisegeek.com has an article on more great uses for mason jars. I also loved this tip from simplyrecipes.com about how many, if not most, blenders can be used with a standard or wide-mouthed mason jar.

Posted By: Nichole

Tuesday, July 14, 2009

60 Days of Summer

I love Martha Stewart's 60 Days of Summer. There are enough crafts on this list to keep your creativity flowing all summer long! With pictures, videos, and how-to instructions for each craft you can host a craft party, entertain using your creations, give summer gifts or just enjoy some craft time with yourself and your family. I love the beach so I have listed a few of my favorite fun and functional crafts for the beach from Martha's 60 Days of Summer!


{star-topped s'mores sticks}

{beach towel tote bag}

{beach towel with pockets}


{terry cloth pillow cases}


You can look for Martha Stewart Craft supplies at ScrappyTime.com
Happy Scrapping!

Posted By: Nichole

Tuesday, May 26, 2009

Handmade Birthday Card

A few important birthdays are coming up and while I was catching up on some much needed TV time I made a birthday card!

Friday, May 22, 2009

Drink Parasols

For my wedding I created drink parasols to put in our signature drink. I followed the instructions from Martha Stewart for their festive drink umbrellas. In honor of Memorial Day weekend I re-created them in red and white. The creative possibilities for this craft are endless!

Posted By: Melissa

Thursday, May 21, 2009

Ribbon Frame

A simple craft that involves photographs and ribbon and I'm in love!

{image from Martha Stewart}

I used Martha Stewart's elegant plaid decorative tape to trim my dandelion photograph. This ribbon tape is really pretty and so easy to use and it's available at ScrappyTime.com too!

{my version}

Posted By: Melissa

Thursday, May 14, 2009

Ice Cream Cone Card

This cupcake card from Martha Stewart inspired me to use my ice cream cone punch. I used paint chips to punch out the ice cream cone shapes and then glued them onto a blank white card. The craft punches from Martha Stewart are my new obsession. They are amazing and the crafty possibilities are endless! You can find this punch and many others at ScrappyTime.com.

{image from Martha Stewart}

{my card}

Posted By: Melissa

Wednesday, May 13, 2009

Framed Four Leaf Clover

A few weeks ago my husband found a four leaf clover. After he brought it home I carefully placed it between two sheets of paper and placed it under a few heavy cookbooks. After it was pressed I decided to preserve it in a small frame for him. I placed the four leaf clover on a small piece of white cardstock that I cut using the glass as a template and then put it in the frame. This was such a simple craft, I would love to try this with a flower too!

{my supplies}

{all framed}

Posted By: Melissa

Wednesday, May 6, 2009

Record the Day

Record the Day is such a cool blog full of endless inspiration. I lost track of time trying to pick just a few of my favorite posts to share. When I was organizing my crafty space I rediscovered a stack of manila file folders that I used for wedding planning. Now I have the perfect use for them, all I need is a date stamp. Be sure to check out her other blog, Lobster and Swan, and her Etsy shop, for more inspiration!


{all images from Record the Day}

Posted By: Melissa

Tuesday, May 5, 2009

Crafting: A Silver Lining in a Tough Economy

I found this article on the website of one of the many "Craft Mafias" that have been popping up here and there. You know if you're a part of one, please don't break my knee caps for exposing you. This article in Entrepreneur Magazine speaks about the crafting world fighting today's economic downturn. More and more people are apparently turning to crafting as an inexpensive form of entertainment. Also one that results in an actual finished product to enjoy. So instead of turning on the old flat screen, make something and contribute to fighting the economic battle of today.

Oh and if you need something to bring your supplies to your friend's house, we can help you out here.


Posted By: Daniel

Friday, May 1, 2009

Flower Greeting Card

I was inspired by a baby welcome card I saw on The Crafts. Dept. It was such a cute idea I had to try it out for myself! Mother's Day is right around the corner and I thought this would be the perfect card.

{Supplies}

Pencil
Protractor or Glass to Trace a Circle

{1st, trace your circle}

{2nd, cut out your circle and place your flower embellishment on the inside of the card so its peeking out the front through the circle}

{3rd, with a pencil, draw in your stem}

{4th, with your fine-tip marker or pen, trace over your penciled in stem and you are finished!}

I love projects where you only need a few supplies and the result is something so unique and elegant. Especially now when we are all trying to simplify, its nice to have projects that you can create from supplies that you have laying around the house. I hope you have time for some scrappy time today!

Posted By: Nichole

Thursday, April 30, 2009

Tissue Paper Flowers

I have always wanted to give tissue paper flowers a try. I followed Martha Stewart's tutorial for Crepe Paper Flowers. This is a great project because it doesn't require a lot of supplies and the result comes out so pretty!

{Supplies}

Crepe paper in various colors

3/16-inch wooden dowel

Small saw or clippers, for the dowel

Floral tape

Masking tape

{Instead of using crepe paper, I used tissue paper}

{Instead of using floral tape for the stem, I used Martha Stewart's Decorative Tape. You can find this at ScrappyTime.com}

{I was able to cut the wooden dowel with my Martha Stewart All-Purpose Scissors}

{My Tissue Paper Flower!}

Posted By: Nichole

Perforating My Motorcycle Jacket

Nichole and Melissa have all these great posts so I thought I would contribute with my macho craft that I did last night, yes that's right, I said macho craft. Summer is here and I can finally get some good Sunday rides in without freezing my hands and face off. I bought this jacket last summer and only wore it a couple times at night as it was too hot for our humid New York summers. So I decided to perforate the leather to get some good airflow through the jacket when out on the road.

{My Alpinestar RC-1 Jacket}

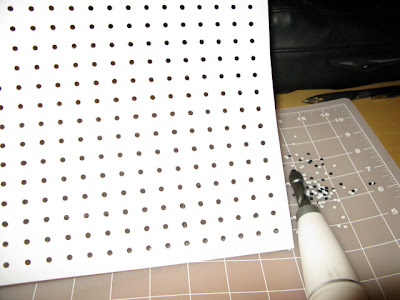
I figured I wanted about an inch between each perforation so I found a website that lets you size and download graph paper for free. I punched holes through the paper so I could use it as a template on the jacket.

{Template and Screw Punch}

{Martha Stewart Screw Punch}

Nichole thankfully had some of her fashion chalk handy so I used it to mark where the holes will be punched on the jacket through the template.
It created a nice grid for me to then use the handy, but not so manly, Martha Stewart Screw Punch. The tool twists as you push down so it cuts a perfect whole in the leather. I used a healing board behind where I was cutting so I didn't cut through the back as well.


{finished}

I was thoroughly impressed with my crafting skills as was Nichole when she saw the finished product. It looks great and doesn't compromise the jacket fit at all. I can't wait to test it out on Sunday as it looks like the weather is going to be great.

Posted By: Daniel

Tuesday, April 28, 2009

Custom Curtain Rods


Last Christmas I got the Domino Book of Decorating and it inspired me to take the time to make my living space something I really loved. One of the first decorating projects were these custom curtain rods. First we measured the length of all our windows and went to Home
Depot. We purchased 3/4" steel piping, flanges and elbows. The total came to around $90 for three windows. Home depot is great because they cut and thread the pipes for you right then and there for no extra charge. When we got home we measured where the flanges would be drilled to the wall using the template of the actual flange. Before drilling the rods to the wall we had to assemble everything. Slide the curtains onto the rod first, attach the elbows to the pipes and the flanges to the elbows and you are ready to hang. We drilled holes into the wall where we marked and installed anchors to support the weight of the rod. Then used countersunk screws to secure everything to the wall. For steel piping, they actually add a very unique and elegant touch to each room. I just LOVE my custom curtain rods!


{elbow}
{steel pipe}

{flange}

Posted By: Nichole
Related Posts Widget for Blogs by LinkWithin